
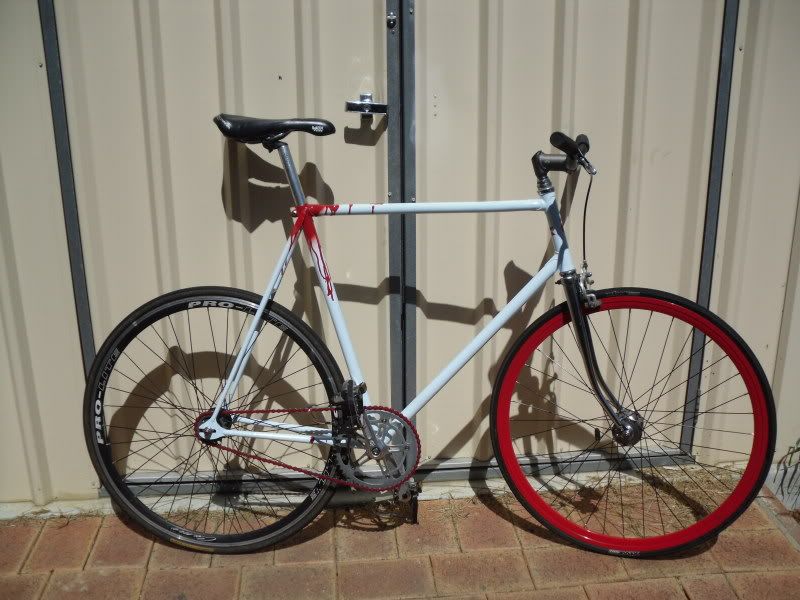
sold my fixie
lost my ladyfriend
she's not under the bed
cant find her anywhere
fuckyas.
Monday, December 14, 2009
Sunday, November 22, 2009
half a degree is not a degree
holy shit i can build bikes. pitty that doesnt make me a high roller.

anyway career choices and quarterlife crisis aside i have some excellent news
1. i bought an awesome fish today. its name is flamin mongrel.
2. i'm going to laos in january. fuckity fuck yeah.
3. i might be buying a boat with a couple mates.
i've never been into the nautical aspect of life but hey. summer, beer, boat. endless opportunities. this summers goal is learn to wake board. maybe it can fill the void snowboarding has left in my life. ah well, if my only regret in life is not wiping the snow off my ass before getting this rad photo life can't be too bad right?

Monday, November 9, 2009
lack of bikeland time
so lately i havent really done alot with bikes. i got a flat on my front tyre and havent been bothered to fix the fixie. however, i managed to find a car that can satisfy my inner bogan. a vlct by the name of charlie that runs a rb25det with 5 gears nestled behind it.
a w e s o m e.

anyway today i'm going to fix my flat and go for a ride. its been way too long.
back to two wheels however, i'm selling my peugeot to re-coup a little coin. campag hubs laced to ambrosio rims, 56 top, 57 seat. $275 hit me up.

i've got a few things in the pipeline in regards to bike projects, just need to get my motorvation back.
Wednesday, October 28, 2009
you're not in a triathlon, you spandex cunt.
today i'd just like to express my general dislike for people who feel the need to wear spandex while cycling.
i'd like to point out three obvious errors in your choice of cloting
1. you're not in a race
2. no one wants to see your junk
3. you're making everyone hate cyclists
go clean yourselves up.
i'd like to point out three obvious errors in your choice of cloting
1. you're not in a race
2. no one wants to see your junk
3. you're making everyone hate cyclists
go clean yourselves up.
Sunday, October 25, 2009
mister sparkelahhh
work cancelled becase of the rain this morning, and i've had this frame lying around that i painted a little while ago. might be a touch hard to see in the photo but its got a nice rainbow flake clearcot over the purple.

 so i built it up as a single speed and i'm pretty happy with how it came out. it rides quite nicely as well

its up for sale for $350 ono, send me an email if you're interested.
so i built it up as a single speed and i'm pretty happy with how it came out. it rides quite nicely as wellits up for sale for $350 ono, send me an email if you're interested.
Wednesday, October 21, 2009
a touch of fine carpentry
i got a new bike today!
so i made a box for it.

but because the bike is already gargantuan, its nealy impossible to get on it with such a stupidly big box on the back. so i might cut the top half off it and make 2 boxes.
either way i made the box so i could fit a carton of booze in it and im pretty sure it should.
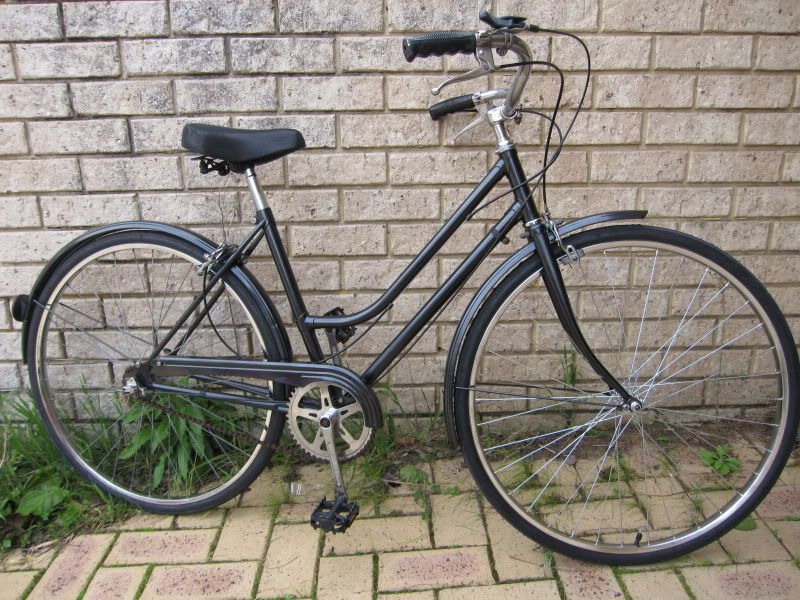
its a pretty sweet rig, its got a 3 speed internal hub and i put a cushy seat on it.
watch the fuck out summertime.
Monday, October 19, 2009
david cheated, long live goliath.
today i stripped and painted the little blue indi 300. its new name is peaches & cream. it'll take a little while for the paint to cure then i'll lay on the 2 pack clearcoat and put it together. think i'll make it a single speed.

but on the subject of old school ladies bikes i thought i'd show you a couple other ones that i've built.
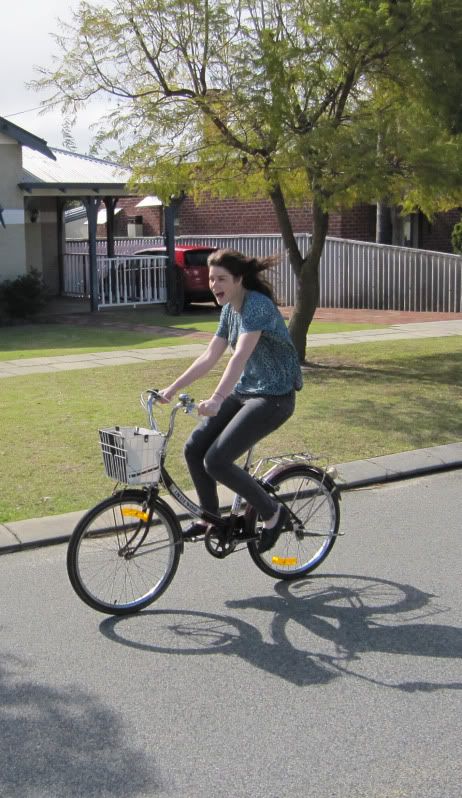
this one is called little miss sunshine. i really liked this one, i had george build me some new wheels for it and it came up really nicely in the end. a girl from mandurah owns it now.


i found this purple frame during verge pickup when i was hungover and coming home from a mates place. it was just a bare frame when i got it, but i was really stoked because it was in really nice condition and the lilac colour had a metallic through it. i had another bike with good parts and an ugly paintjob so i made one good one out of the two. it lives in cottesloe now. when i sold it, it had a white seat on it not the black one in the photo.

this one is another of my favourites. i built it for a girl called alison who always wanted a sparkly black bike. it started life as a purple speedwell invader missing its front wheel, handlebars and brakes. i had a new wheel built and got it powdercoated in black onyx. it had a 3 speed internal hub and looked really nice when the sun hit the paint.


and heres the last one for today, the indi 500 family. absolutely flippin sweet if you ask me.


but on the subject of old school ladies bikes i thought i'd show you a couple other ones that i've built.
this one is called little miss sunshine. i really liked this one, i had george build me some new wheels for it and it came up really nicely in the end. a girl from mandurah owns it now.
i found this purple frame during verge pickup when i was hungover and coming home from a mates place. it was just a bare frame when i got it, but i was really stoked because it was in really nice condition and the lilac colour had a metallic through it. i had another bike with good parts and an ugly paintjob so i made one good one out of the two. it lives in cottesloe now. when i sold it, it had a white seat on it not the black one in the photo.
this one is another of my favourites. i built it for a girl called alison who always wanted a sparkly black bike. it started life as a purple speedwell invader missing its front wheel, handlebars and brakes. i had a new wheel built and got it powdercoated in black onyx. it had a 3 speed internal hub and looked really nice when the sun hit the paint.
and heres the last one for today, the indi 500 family. absolutely flippin sweet if you ask me.
Wednesday, October 14, 2009

Monday, October 12, 2009
hasta mas tardes, frijoles.
well the ebay auction for frijoles ended today, for $400. i guess in a way its nice to know that other people liked how i built it, four hundred bucks is a fair bit of coin for a fixie with a suicide hub. i still hope the seller who claimed it as his own build gets some seriously bad ju-ju.
todo bendecho, siempre.
feens
todo bendecho, siempre.
feens
a guide to building a fixie
i thought i'd take some photos while building my fixie up after i painted it and give a quick run down on how to build one.
you'll need a few basic tools as you go. spanners, hammer etc. bike shops generally have great customer service and will help you out if you get stuck. if i didnt have a specific tool the lads at south perth bike force have helped me out more times than i can remember.
also, if you take off the top of a pedestal fan, you can use it as a bike stand and insert the fan tube into the seat tube of the frame.

so anyway, first off you strip down your bike. take off everything, clean it, and keep it in a safe spot. throw away all the gears and shifters. you'll need to get your hands on a fixed rear wheel.
with a bare frame, we need to install a bottom bracket. most old school road & track frames have an english threaded 68mm bottom bracket shell, with a loose bearing square taper bottom bracket. if you are unsure, take your frame to your local bike shop and they'll be able to tell you for sure.
this is what a bottom bracket looks like. there are two cups (threaded parts) that have bearings inside them and they hold the spindle (shaft) in place, with a lockring on the non-drive side cup.
its pretty importat to note that the drive side on an english threaded bottom brack is reversed, so forget lefty loosey, righty tighty - its the other way round ONLY for the driveside ok.

here you can see it dissasembled.

you can either regrease and reinstall the old loose bearing bb setup, or buy a brand new sealed bearing bb for about $40 in an array of spinde sizes. the benefits of buying a new one is you can choose what size you need to get the chainline straight, and they dont need maintenance.
so i bought a new one, and a tool to install it which costs about $4 - its the splined tool on the left hand side in the photo below.
this is how it should be installed, it tells you which side is right and which is left so its pretty brainless. remember the drive side thread is reversed.


now its time to check your chainline. the way i check to see if my chainline is straight, is by using a long ruler. i place it on the chainwheel, making sure it is flush, then you see if it lines up with the rear cog, as per the photo below.
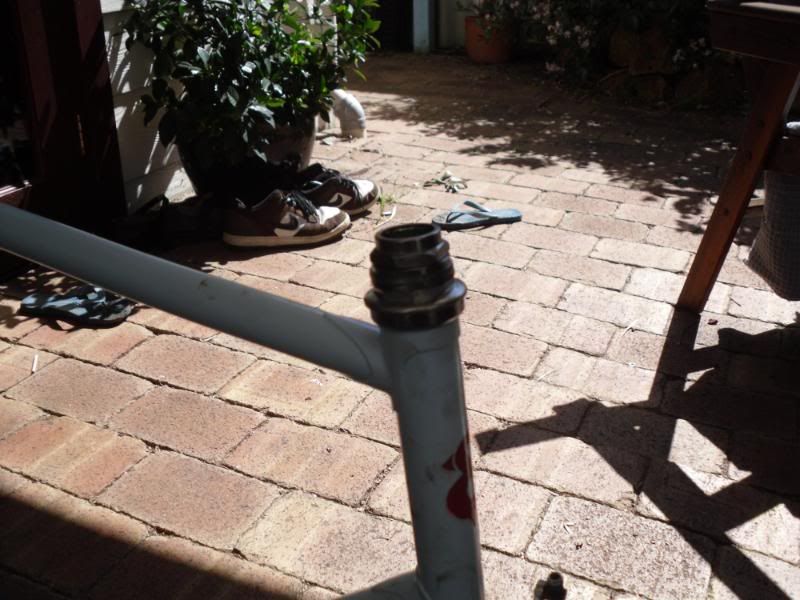
heres the crown race fitted to the fork. the crown race should be fitted flush on the crown without movement.

below is the bearing sitting on the crown race, and the lower bearing cup (above my fingers) that needs to be fitted into the bottom of the head tube of the frame.

below you can see both the bearing cups installed. the two bearing cups, bearings and top lock nut are referred to as a headset. oldschool ones like in the pictures are referred to as threaded headset and use threaded forks. new ones are threadless (or ahead headsets) and use threadless forks but im not going to go into that now.

once both the bearing cups & bearings are installed with new grease, you can fit the fork, lock nuts and spacers if required. due to the fork not being original on this frame, i've had to use lots of spacers. and yes, i know it looks absolutely shit house. i will replace the headset with a good one when i find a good fork for it.


you'll need a few basic tools as you go. spanners, hammer etc. bike shops generally have great customer service and will help you out if you get stuck. if i didnt have a specific tool the lads at south perth bike force have helped me out more times than i can remember.
also, if you take off the top of a pedestal fan, you can use it as a bike stand and insert the fan tube into the seat tube of the frame.
so anyway, first off you strip down your bike. take off everything, clean it, and keep it in a safe spot. throw away all the gears and shifters. you'll need to get your hands on a fixed rear wheel.
with a bare frame, we need to install a bottom bracket. most old school road & track frames have an english threaded 68mm bottom bracket shell, with a loose bearing square taper bottom bracket. if you are unsure, take your frame to your local bike shop and they'll be able to tell you for sure.
this is what a bottom bracket looks like. there are two cups (threaded parts) that have bearings inside them and they hold the spindle (shaft) in place, with a lockring on the non-drive side cup.
its pretty importat to note that the drive side on an english threaded bottom brack is reversed, so forget lefty loosey, righty tighty - its the other way round ONLY for the driveside ok.
here you can see it dissasembled.
you can either regrease and reinstall the old loose bearing bb setup, or buy a brand new sealed bearing bb for about $40 in an array of spinde sizes. the benefits of buying a new one is you can choose what size you need to get the chainline straight, and they dont need maintenance.
so i bought a new one, and a tool to install it which costs about $4 - its the splined tool on the left hand side in the photo below.
this is how it should be installed, it tells you which side is right and which is left so its pretty brainless. remember the drive side thread is reversed.
and here it is installed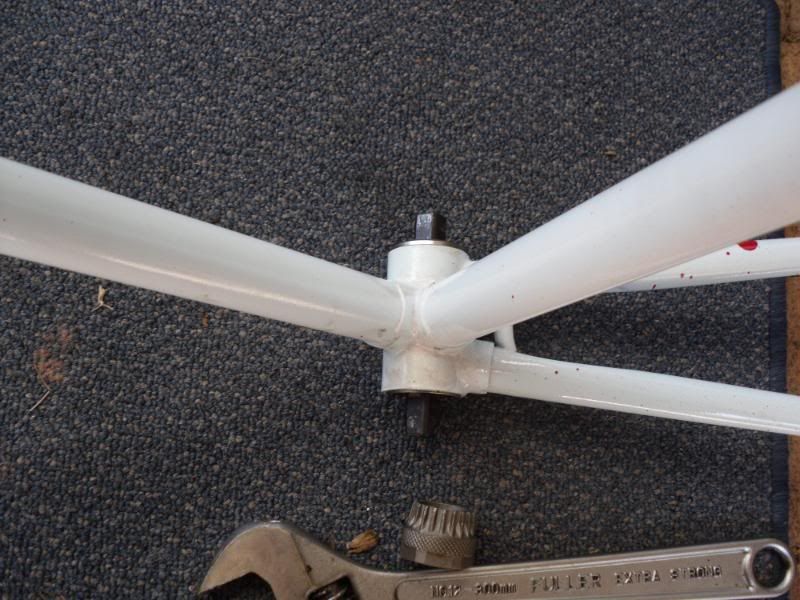
time to move on to cranks. installing your crank is alot easier than removing it. to remove it, you need a tool called a crank puller and a 16mm spanner. crank pullers cost about $5 from your local bike shop. anyway, put on your drive side crank & chainring. make sure its on properly.the parktool website has info on installing/removing cranks here http://parktool.com/repair/readhowto.asp?id=103
now you install your rear wheel which should have a fixed gear on it. make sure that it is straight, this is important. another thing which is important to use, is track nuts. this is even more-so on road frame fixie conversions, so your wheel doesnt come off while your trying to skid. heres a picture of a track nut (on the right) compared to a regular nut from a road bike. it has a washer built in to the nut. they're cheap, they're worth it, do it.

now its time to check your chainline. the way i check to see if my chainline is straight, is by using a long ruler. i place it on the chainwheel, making sure it is flush, then you see if it lines up with the rear cog, as per the photo below.
if your chainline isnt straight there are a few ways to get it straight. different bottom bracket spindle legnth, different crankset, changing the chainring from inner to outer of the crank arm (and vise versa), re-dishing the rear wheel and so on. take your bike to your lbs if you need advice. just be sure to get your chainline straight, its really quite important. with that said, it can be out by a milimeter or so, but personally i wouldnt want it anything but dead straight.

when you get your chainline straight you can install your chain. go buy a good quality BMX chain because it will be strong, and thats what you want when riding fixed. especially if you plan to do skids. they're not expensive, wont be more than $15.
pop off the quick release link and use a link removal tool to get your chain to the appropriate size. make sure when you fit your chain, the clip which is sitting on the bottom of my palm is "as the fish swims" when you pedal forward. (basically the hole in the clip faces backwards when riding). hope that makes sense.

now you can install your forks. below is a picture of the fork and the crown race (on the right).

heres the crown race fitted to the fork. the crown race should be fitted flush on the crown without movement.
below is the bearing sitting on the crown race, and the lower bearing cup (above my fingers) that needs to be fitted into the bottom of the head tube of the frame.
below you can see both the bearing cups installed. the two bearing cups, bearings and top lock nut are referred to as a headset. oldschool ones like in the pictures are referred to as threaded headset and use threaded forks. new ones are threadless (or ahead headsets) and use threadless forks but im not going to go into that now.
once both the bearing cups & bearings are installed with new grease, you can fit the fork, lock nuts and spacers if required. due to the fork not being original on this frame, i've had to use lots of spacers. and yes, i know it looks absolutely shit house. i will replace the headset with a good one when i find a good fork for it.
so now throw on the front wheel, stem & handlebars, brakes if you are running them, pedals, seatpost & seat. thats all pretty straightforward. oh yeah, the (left) non-drive side pedal thread is reverse. other than that you should have a complete fixie.
if you have any problems like tensioning the chain you can youtube tutorials which are pretty helpful.
dont mind all the fucked up proportions of the photos either i dunno how to resize shit properly with this editor
good luck, ride safe.
Sunday, October 11, 2009
uncle chop chop!
i beat a pair of bogans to these little gems and proceeded to polish the pair. i gave the one in the front of the picture to my friends daughter and sold the other to a family for $60 who said they wanted it for their daughter.

a few days later i was in freo with some mates and walked past off the wall, where i saw my chopper with a flat front tyre & some streamers sticky-taped to the handlebars. the lady i sold it to came out of the shop to let her dogs outside & i asked her how much she was selling it for, to which she replied $490.

retail mark-up is a bitch.
Wednesday, October 7, 2009
ebay is a cesspool of lies
i wasn't going to post this one so soon, but i will. its name was frijoles con amor and it was my first fixie.

i bought frijoles complete but it needed alot of work. it was a speedwell invader, a little rough but i saw potential. i completely stripped it and got it ready for paint, layed on some flat black and initially i handpainted the lugs white. i replaced the seat, stem and put on bar tape. i stripped the wheels and took them to get sandblasted and powdercoated white, they were pretty rough and rusty. the powdercoating came out ok, nothing too flash i learnt not to get whole wheels powdercoated from that experience. i put it back together but had trouble getting the chainline straight so i took it over to my friend george who is very clued on when it comes to bikes, and in general he's a nice bloke so he helped me out. rear axle was bent so we replaced it, rebuilt the bearings and redished the wheel so it was spot on, chucked on some track nuts and then changed over the chainring to a more suitable ratio. george also rebuilt the rear rim with some chrome spoke nipples for me.

anyways, it came out pretty decent in the end, it was a good bike to learn on & i learnt alot from george in regard to building them properly. anyway i wanted to build a better one using a track frame and 700c's so i sold it.

while scrounging on ebay last night, i found it up for sale. exactly the same but a white chain. the guy is claiming that he built it from ground up. i dont know why, but when it comes to cars, bikes & bicycles people lie like fuck on ebay.
heres a quote directly from his ebay ad:
"Hi,Up for auction is a Fixie that I have built from the ground up. The frame had the decals removed so I am not entirely sure what it is. I have painted it black (OK job) and painted the rims white (not a professional job :). It is a fixed gear (not a single speed, so Beware)."
"This was a fun project. I am sad to see it go, but I have way too many bikes cluttering up the house."
here's a pic from his ebay ad:

in the end it doesnt really matter that he's selling it, but at least dont take the credit. jerkface.
tommorow i'll post a story about the chopper that now lives in fremantle.
i bought frijoles complete but it needed alot of work. it was a speedwell invader, a little rough but i saw potential. i completely stripped it and got it ready for paint, layed on some flat black and initially i handpainted the lugs white. i replaced the seat, stem and put on bar tape. i stripped the wheels and took them to get sandblasted and powdercoated white, they were pretty rough and rusty. the powdercoating came out ok, nothing too flash i learnt not to get whole wheels powdercoated from that experience. i put it back together but had trouble getting the chainline straight so i took it over to my friend george who is very clued on when it comes to bikes, and in general he's a nice bloke so he helped me out. rear axle was bent so we replaced it, rebuilt the bearings and redished the wheel so it was spot on, chucked on some track nuts and then changed over the chainring to a more suitable ratio. george also rebuilt the rear rim with some chrome spoke nipples for me.
anyways, it came out pretty decent in the end, it was a good bike to learn on & i learnt alot from george in regard to building them properly. anyway i wanted to build a better one using a track frame and 700c's so i sold it.
while scrounging on ebay last night, i found it up for sale. exactly the same but a white chain. the guy is claiming that he built it from ground up. i dont know why, but when it comes to cars, bikes & bicycles people lie like fuck on ebay.
heres a quote directly from his ebay ad:
"Hi,Up for auction is a Fixie that I have built from the ground up. The frame had the decals removed so I am not entirely sure what it is. I have painted it black (OK job) and painted the rims white (not a professional job :). It is a fixed gear (not a single speed, so Beware)."
"This was a fun project. I am sad to see it go, but I have way too many bikes cluttering up the house."
here's a pic from his ebay ad:
in the end it doesnt really matter that he's selling it, but at least dont take the credit. jerkface.
tommorow i'll post a story about the chopper that now lives in fremantle.
Tuesday, October 6, 2009
malvern star, the beginning.
the habbit started with an overpriced malvern star picked up off an old boy in thornlie. the front brake cable snapped as soon as i got it home and ever since then i've been learning how to fix pushies. i enjoy putting together bikes almost more than i enjoy riding them, the sense of accomplishment is addictive. after i built my first one, i wanted to do more - in different colours and different styles, so i did, and this page will show you a few of my bikes, my friends bikes & probably a few random bikes too.
this was my malvern star as it sat when i bought it. rusty, dilapidated and a bit rough. 10 gears of fury rolling on 27" wheels.

hawthorne green with white handpainted lugs.

finally it was given a set of 700c alex rims and i converted it to single speed.

that was the start. i'll show you more next time.
-martyn.
Subscribe to:
Posts (Atom)
